SaaS Like Isolation in Django Rest Framework
Hi there! In this post, we talk about how to add SaaS-like isolation to a Django Rest Framework service without bringing in third-party libraries.
First, let’s start with why? I wanted to learn how to use Django Rest Framework by building a small SaaS service. I started googling to see if there were any resources available. Most of them suggested to use a third-party library such as Django Organizations, Django tenant schemas or use DB namespaces, all of which are only compatible with Postgres. I didn’t want to rely on a third-party library for this, since this would mean, significant ramp-up time, another thing that could break, another thing to update, and another layer of abstraction that could end up getting in my way. I decided to do this myself.
If you want to follow along, here’s what you will need:
- A computer with python 3 installed (I used python 3.6).
- A virtual environment already created and with Django (I used version 2.1.2) and Django rest framework (I used version 3.8.2).
We use SQLite for the database since it doesn’t make a difference for this example. Note that if you’re planning on using this for production, you should not use SQLite.
Use-cases
For our sample project, we’re going to build the backend of a messaging API for a company. Here is a list of use-cases that our app needs to support:
Users must be able to…
- signup. A Company should be created automatically.
- create other users in the same company (we’re going to ignore admin users and permissions).
- see a list of users from the same company.
- send a message to another user in the same company.
- see the messages they sent or received.
Users must NOT be able to…
- see the users from other companies.
- read messages from other companies.
- send messages to users in other companies.
- see messages from other users (even in the same company).
Start the project
Let’s start our project. I name mine saas_django.
$ django-admin startproject saas_django
$ cd saas_django
$ tree | grep -v pyc
.
├── manage.py
└── saas_django
    ├── __init__.py
    ├── settings.py
    ├── urls.py
    └── wsgi.py

1 directory, 5 files
Note: I usually commit all my changes every time I start a project or create a new app. This is an excellent way to provide checkpoints for yourself to be able to go back if needed. I’m going to skip the git commands in here, but I encourage you to use version control to track your project.
The accounts app
Let’s create an app called accounts.
$ python manage.py startapp accounts
$ tree | grep -v pyc
.
├── accounts
│   ├── __init__.py
│   ├── admin.py
│   ├── apps.py
│   ├── migrations
│   │   └── __init__.py
│   ├── models.py
│   ├── tests.py
│   └── views.py
├── manage.py
└── saas_django
    ├── __init__.py
    ├── settings.py
    ├── urls.py
    └── wsgi.py

4 directories, 14 files
Let’s open models.py in the accounts folder and put in the following code.
import uuid
from django.contrib.auth.models import AbstractUser
from django.db import models, transaction


class CompanyManager(models.Manager):
    """Manager for the Company model. Also handles the account creation"""

    @transaction.atomic
    def create_account(self, company_name, username, password, company_address=None):
        """Creates a Company along with the User and returns them both"""

        company = Company(
            name=company_name,
            address=company_address,
        )
        company.save()

        user = User.objects.create_user(
            username=username,
            password=password,
            company=company,
        )

        return company, user


class Company(models.Model):
    id = models.UUIDField(primary_key=True, default=uuid.uuid4, editable=False)
    name = models.CharField('name', max_length=100)
    address = models.CharField('address', max_length=250, blank=True)

    objects = CompanyManager()

    class Meta:
        db_table = 'companies'

    def __str__(self):
        return self.name


class User(AbstractUser):
    id = models.UUIDField(primary_key=True, default=uuid.uuid4, editable=False)
    company = models.ForeignKey(Company, related_name='%(class)s', on_delete=models.CASCADE, editable=False)

    class Meta:
        db_table = 'users'

    def __str__(self):
        return f'({self.company.name}) - {self.username}'
This code defines a CompanyManager, a Company, and a User. Let’s dive into what each of these does:
Company:- This is the model that represents the SaaS account.
- Every other model should have a
ForeignKeythat links back to this one.
CompanyManager:- Provides a
create_accountmethod that ensures that aCompanyis always created with aUserassigned to it. - Tom Christie recommends that we do this to be able to reason where changes to the DB are taking place (see this great video).
- Provides a
User:- Custom User model. It is recommended not to use Django’s provided User model and create a custom one instead. Changing it afterward seems to be very painful.
- Defines the
__str__method to return the company name inside parentheses and the username. This will be useful later to be able to identify the company that a user belongs to.
Note: I also added the db_table Meta field. This isn’t required, and Django will automatically name the DB table for you (for example the Company table would have the name accounts_company). I decided to add the db_table to follow the advice from this blog post to manually name all of my database tables.
Let’s open up our settings.py and add the following:
INSTALLED_APPS = [
    'django.contrib.admin',
    'django.contrib.auth',
    'django.contrib.contenttypes',
    'django.contrib.sessions',
    'django.contrib.messages',
    'django.contrib.staticfiles',

    # Add these two lines
    'rest_framework',
    'accounts',
]

AUTH_USER_MODEL = 'accounts.User'
We add rest_framework and our accounts app to the INSTALLED_APPS list. We also override the default User model and use our own instead by setting AUTH_USER_MODEL to accounts.User.
Let’s create our migrations and migrate our database.
$ python manage.py makemigrations
Migrations for 'accounts':
  accounts/migrations/0001_initial.py
    - Create model User
    - Create model Company
    - Add field company to user
    - Add field groups to user
    - Add field user_permissions to user
$ python manage.py migrate
Operations to perform:
  Apply all migrations: accounts, admin, auth, contenttypes, sessions
Running migrations:
  Applying contenttypes.0001_initial... OK
  Applying contenttypes.0002_remove_content_type_name... OK
  Applying auth.0001_initial... OK
  Applying auth.0002_alter_permission_name_max_length... OK
  Applying auth.0003_alter_user_email_max_length... OK
  Applying auth.0004_alter_user_username_opts... OK
  Applying auth.0005_alter_user_last_log in_null... OK
  Applying auth.0006_require_contenttypes_0002... OK
  Applying auth.0007_alter_validators_add_error_messages... OK
  Applying auth.0008_alter_user_username_max_length... OK
  Applying auth.0009_alter_user_last_name_max_length... OK
  Applying accounts.0001_initial... OK
  Applying admin.0001_initial... OK
  Applying admin.0002_logentry_remove_auto_add... OK
  Applying admin.0003_logentry_add_action_flag_choices... OK
  Applying sessions.0001_initial... OK
Our database is now created along with the users and companies tables. Let’s start working on our serializers. Create a new file called serializers.py inside of the accounts folder and add the following code:
from django.contrib.auth import get_user_model
from rest_framework import serializers
from .models import Company


User = get_user_model()


class UserSerializer(serializers.HyperlinkedModelSerializer):

    class Meta:
        model = User
        fields = (
            'url',
            'id',
            'username',
            'password',
        )
        # Make sure that the password field is never sent back to the client.
        extra_kwargs = {
            'password': {'write_only': True},
        }

    def create(self, validated_data):
        return User.objects.create_user(**validated_data)

    def update(self, instance, validated_data):
        updated = super().update(instance, validated_data)

        # We save again the user if the password was specified to make sure it's properly hashed.
        if 'password' in validated_data:
            updated.set_password(validated_data['password'])
            updated.save()
        return updated


class CompanySerializer(serializers.HyperlinkedModelSerializer):

    class Meta:
        model = Company
        fields = (
            'id',
            'name',
            'address',
        )


class AccountSerializer(serializers.Serializer):
    """Serializer that has two nested Serializers: company and user"""

    company = CompanySerializer()
    user = UserSerializer()

    def create(self, validated_data):
        company_data = validated_data['company']
        user_data = validated_data['user']

        # Call our CompanyManager method to create the Company and the User
        company, user = Company.objects.create_account(
            company_name=company_data.get('name'),
            company_address=company_data.get('address'),
            username=user_data.get('username'),
            password=user_data.get('password'),
        )

        return {'company': company, 'user': user}

    def update(self, instance, validated_data):
        raise NotImplementedError('Cannot call update() on an account')
We create 3 serializers:
UserSerializer- Serializes the
Usermodel. - Makes the
passwordfield write-only to prevent our clients from ever seeing a password (even if it’s hashed). - Overrides the
updatemethod to properly handle a password update (not the most elegant solution since it involves two writes to the DB but it’s the only way I found that reuses the parent’s logic).
- Serializes the
CompanySerializer- Serializes the
Companymodel.
- Serializes the
AccountsSerializer- Uses the previously defined serializers.
- Calls the
create_accountmethod that we added inCompanyManagerto create a new Company and User. - Overrides the
updatemethod to throw an exception if called. We do this because we only want this serializer to be used for account creation. After that, an edit can be made directly in the/api/v1/usersendpoint or in the/api/v1/companyendpoint (not implemented yet).
Let’s create the views for our accounts, users, and companies. Open the views.py file in the accounts directory and add the following code:
from django.contrib.auth import get_user_model
from rest_framework import generics, permissions
from . import serializers


User = get_user_model()


class AccountCreate(generics.CreateAPIView):
    name = 'account-create'
    serializer_class = serializers.AccountSerializer


class UserList(generics.ListCreateAPIView):
    name = 'user-list'
    permission_classes = (
        permissions.IsAuthenticated,
    )
    serializer_class = serializers.UserSerializer
    queryset = User.objects.all()

    def perform_create(self, serializer):
        company_id = self.request.user.company_id
        serializer.save(company_id=company_id)

    def get_queryset(self):
        # Ensure that the users belong to the company of the user that is making the request
        company_id = self.request.user.company_id
        return super().get_queryset().filter(company_id=company_id)


class UserDetail(generics.RetrieveUpdateDestroyAPIView):
    name = 'user-detail'
    permission_classes = (
       permissions.IsAuthenticated,
    )
    serializer_class = serializers.UserSerializer
    queryset = User.objects.all()

    def get_queryset(self):
        # Ensure that the user belongs to the company of the user that is making the request
        # Note that this method is identical to the one in `UserList`
        company_id = self.request.user.company_id
        return super().get_queryset().filter(company_id=company_id)


class CompanyDetail(generics.RetrieveUpdateAPIView):
    name = 'company-detail'
    permission_classes = (
        permissions.IsAuthenticated,
    )
    serializer_class = serializers.CompanySerializer

    def get_object(self):
        # Ensure that users can only see the company that they belong to
        return self.request.user.company
We define 4 views:
AccountCreate- Only meant for account creation purposes.
- Inherits from
CreateAPIViewso there won’t be a way to list or update the accounts.
UserList- Provides a list of users.
- Overrides the
get_querysetmethod to return only the results related to the company of the caller.
UserDetail- Provides a view for a single user.
- Overrides the
get_querysetmethod in the same way theUserListview does (we’ll address this later). If you try to get a user from a different company, you will see a404 Not Foundresponse.
CompanyDetail- Provides the detailed view of a
Company. - Overrides the
get_objectmethod to return the Company that the user belongs to. - We don’t need to create a
CompanyListsince there is no use-case to see a list of all the companies.
- Provides the detailed view of a
Note: We’re only checking for IsAuthenticated permission (except for account creation). This allows a User in the same company to modify/delete any user in the company (including themselves). This can be fixed by creating custom permissions class.
Let’s create our URLs. Create a file named urls.py in the accounts folder and add the following code:
from django.urls import path
from . import views


urlpatterns = [
    path('', views.AccountCreate.as_view(), name=views.AccountCreate.name),
    path('users/', views.UserList.as_view(), name=views.UserList.name),
    path('users/<uuid:pk>', views.UserDetail.as_view(), name=views.UserDetail.name),
    path('company', views.CompanyDetail.as_view(), name=views.CompanyDetail.name),
]
Open the main urls.py located in the django_saas folder and add the following code:
from django.contrib import admin
from django.urls import path, include

urlpatterns = [
    path('admin/', admin.site.urls),
    path('api/v1/accounts/', include('accounts.urls')),

    path('api/v1/auth/', include('rest_framework.urls'))
]
We define our URLs and include the URLs for authentication from rest_framework. The URLs for our API look like this:
/api/v1/accounts/: We can onlyPOSTto this URL to create new account (company + user)./api/v1/users/: Can callPOSTto create a new user for the company orGETto get all the users in the company./api/v1/users/<uuid>: Can callGET,PUT,PATCHandDELETE.GETreturns a detailed view of the user with primary key<uuid>./api/v1/company: Can callGETandPUT,PATCHto get/update the company of the user that made the request./api/v1/auth/login: URL to log in using rest_framework’s built-in log in.
There is one more change I want to do before we test our accounts app. Open the settings.py file and add the following line:
# ...
LOGIN_REDIRECT_URL = '/api/v1/accounts/users'
Setting the LOGIN_REDIRECT_URL will redirect to this URL once a user has logged in successfully.
Let’s fire up the server. Go to your terminal and type in the following command:
$ python manage.py runserver
Performing system checks...

System check identified no issues (0 silenced).
October 17, 2018 - 06:05:27
Django version 2.1.2, using settings 'saas_django.settings'
Starting development server at http://127.0.0.1:8000/
Quit the server with CONTROL-C.
Our server is up! Now go to your favorite browser and navigate to http://127.0.0.1:8000/api/v1/accounts/. You should see something like this:
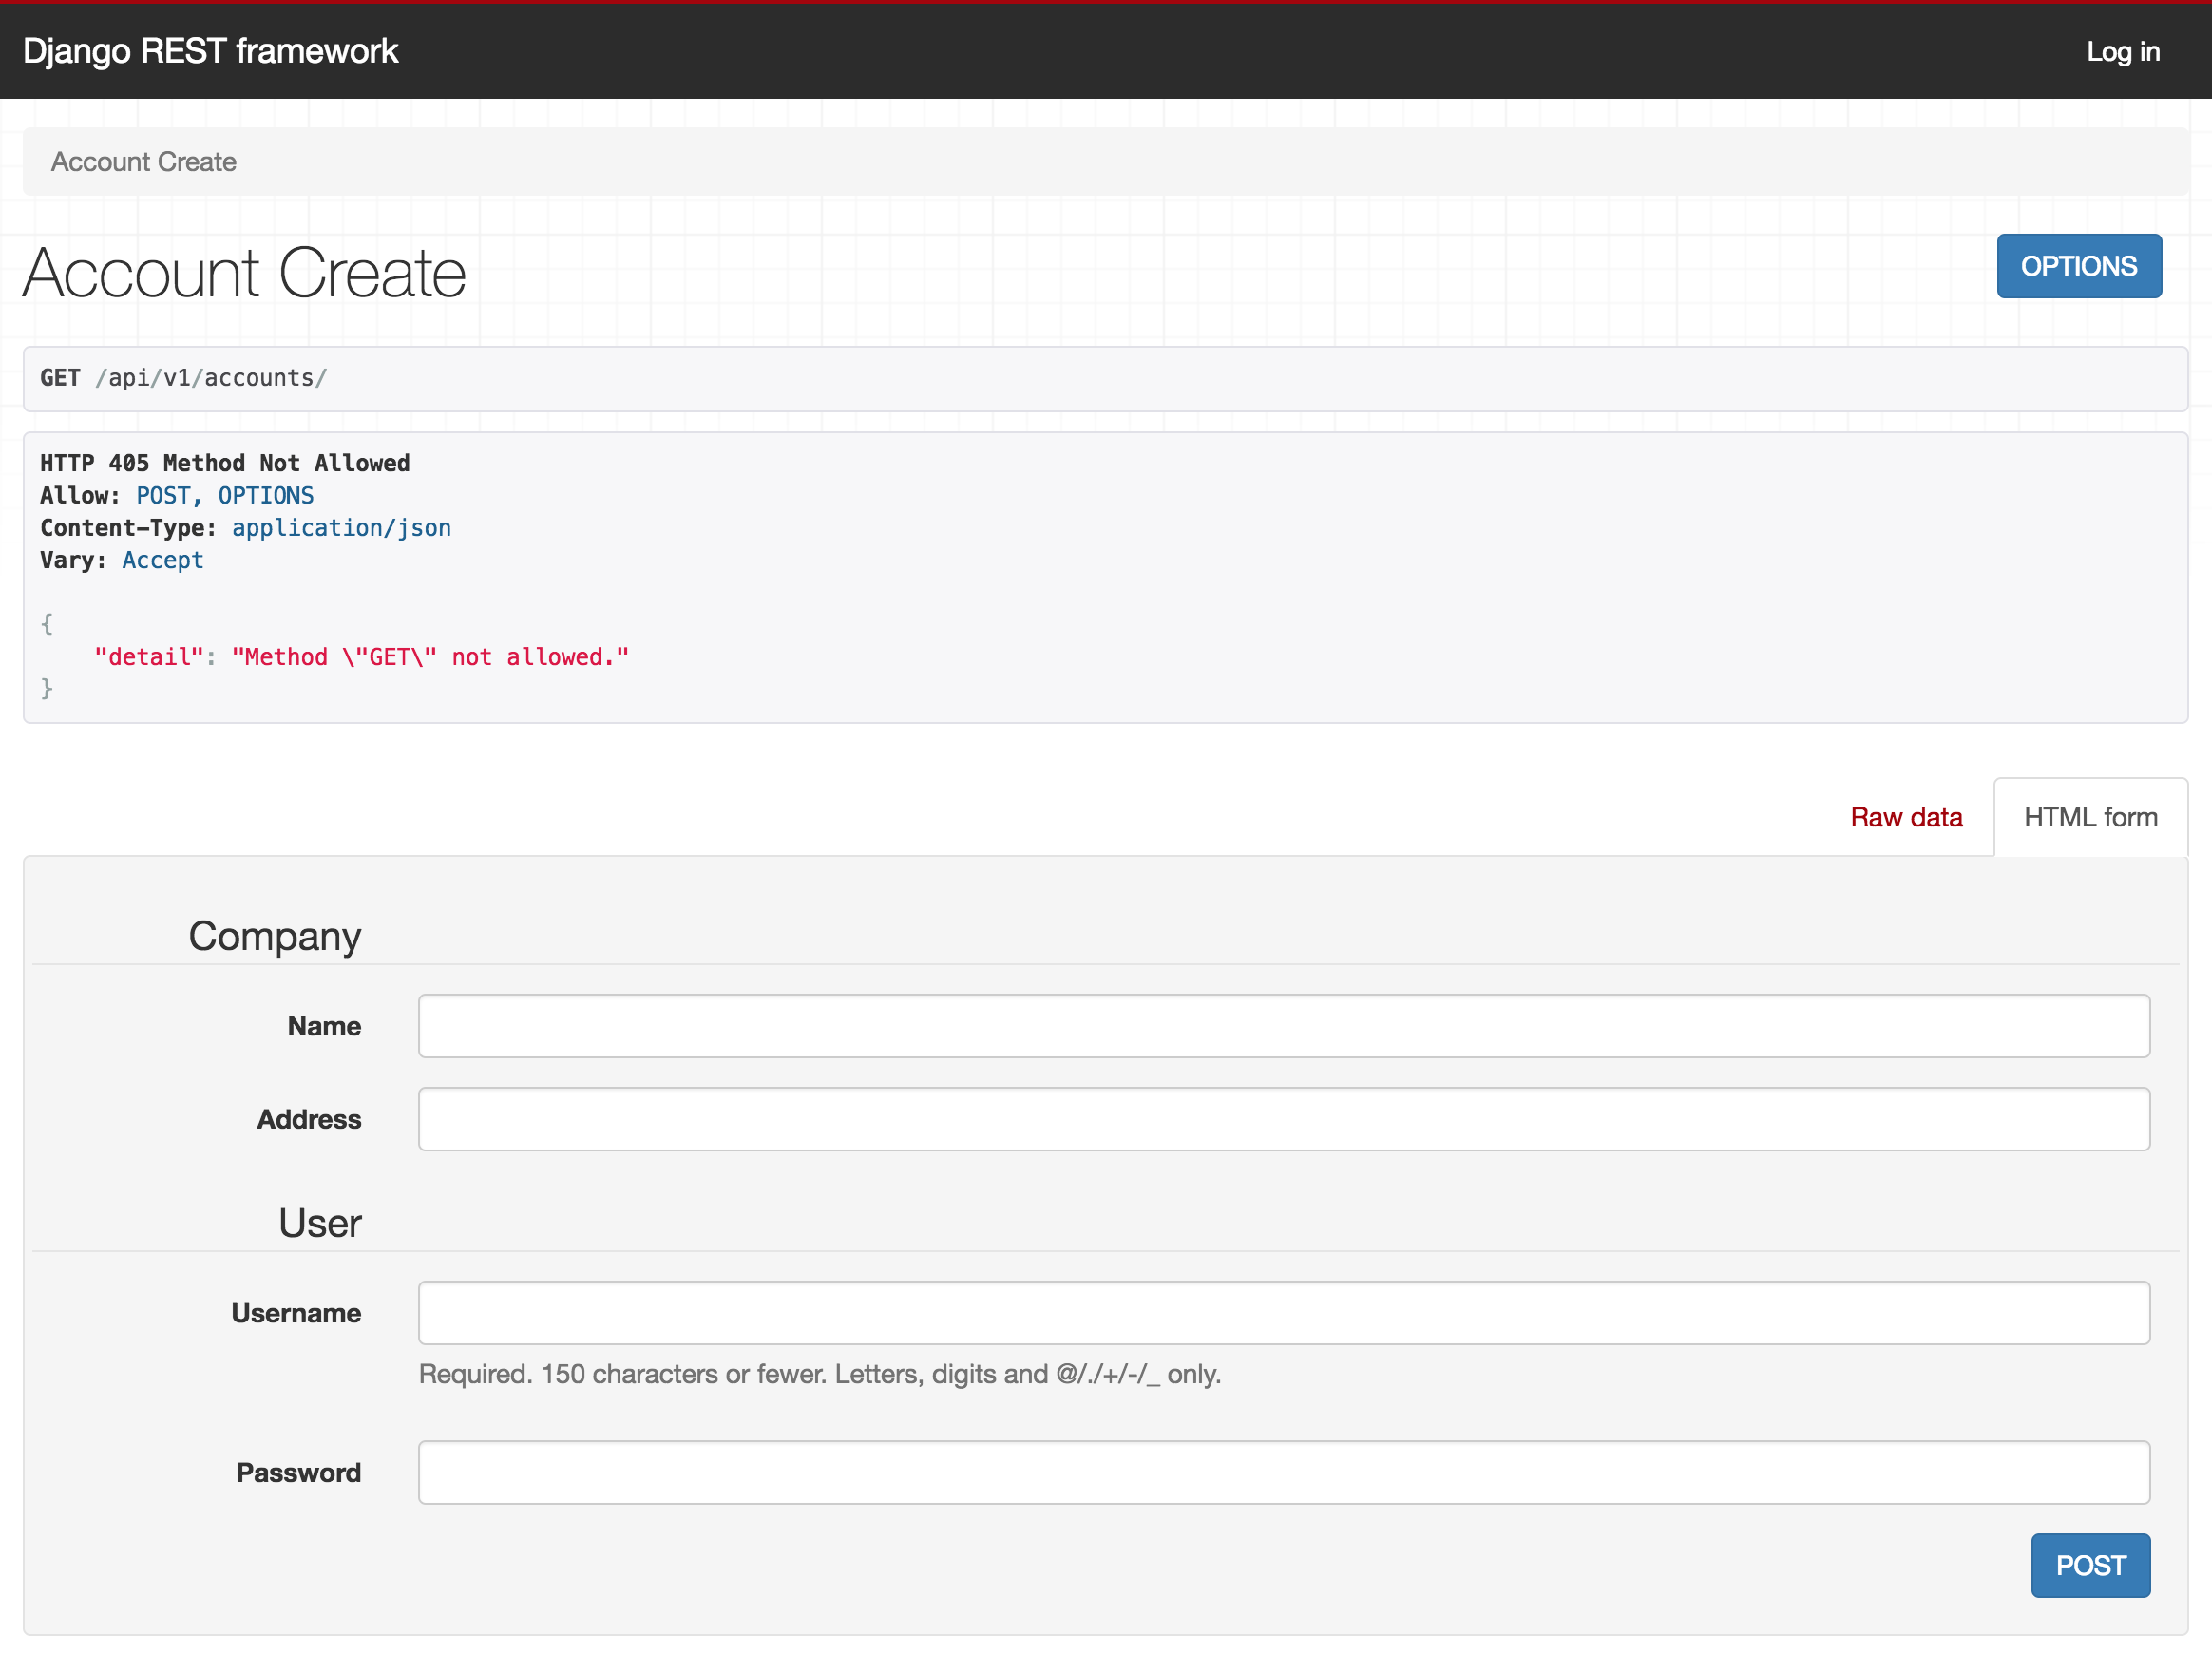 Note that the
 GET actually failed with a 405 Method Not Allowed. This is expected since this view should only be used for account creation. Note that the form clearly splits the Company and the User since we’re using the AccountSerializer.
Let’s create two accounts.
Account 1 information
- Company Name: Company 1
- Username: user1
Account 2 information
- Company Name: Company 2
- Username: user2
Input this information in the fields (select a password) and click the POST button. If all goes well, you should see something like this:
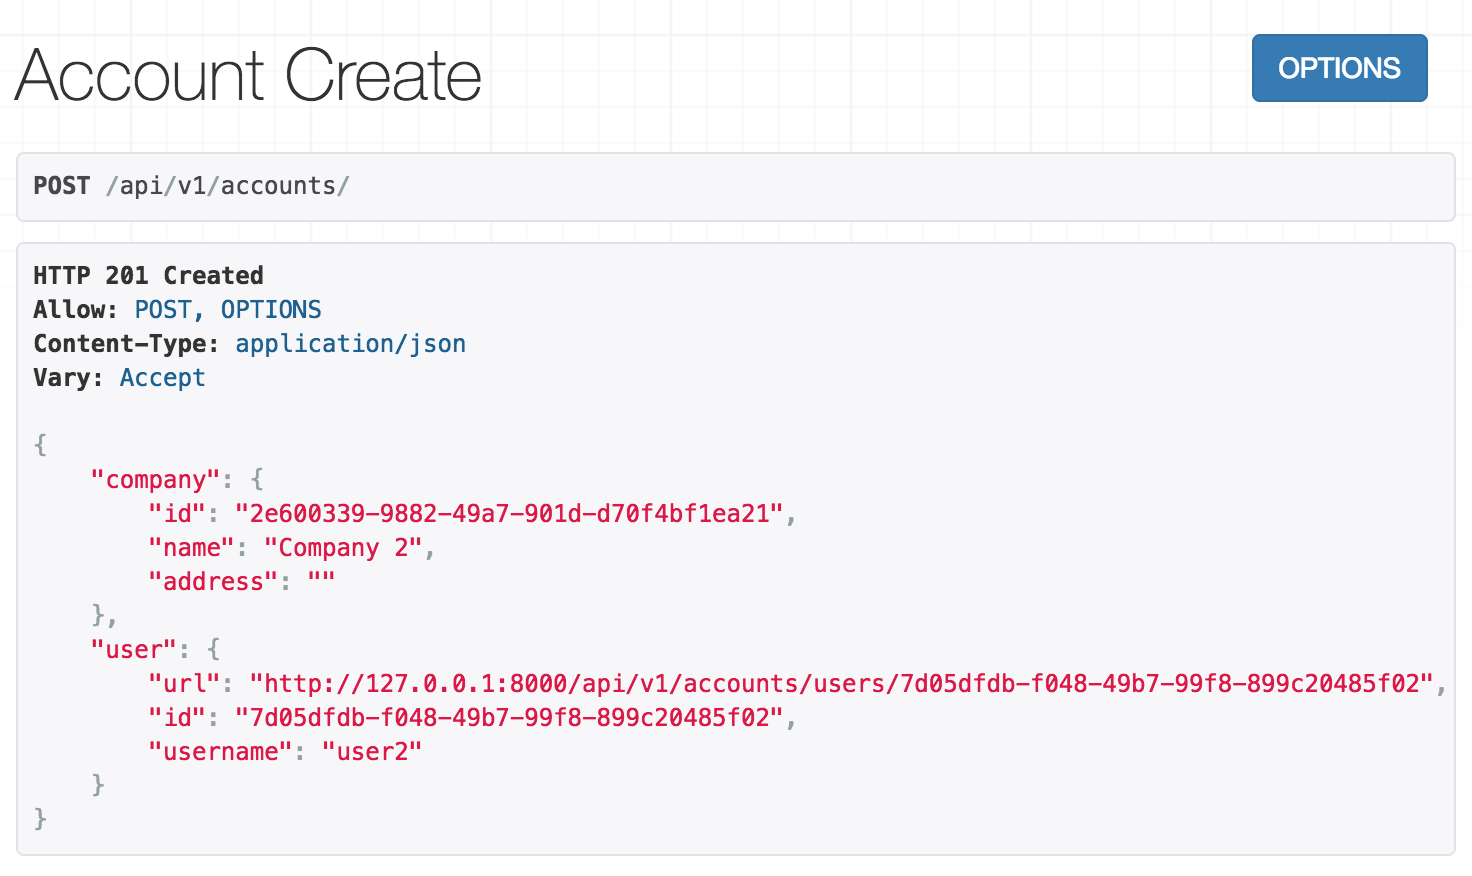 Note that the password doesn’t show up in the returned JSON since we set it to be write-only in the
 UserSerializer.
Let’s log in as user1. Navigate to http://127.0.0.1:8000/api/v1/auth/login and use the credentials to log in as user1. You should see something like this:
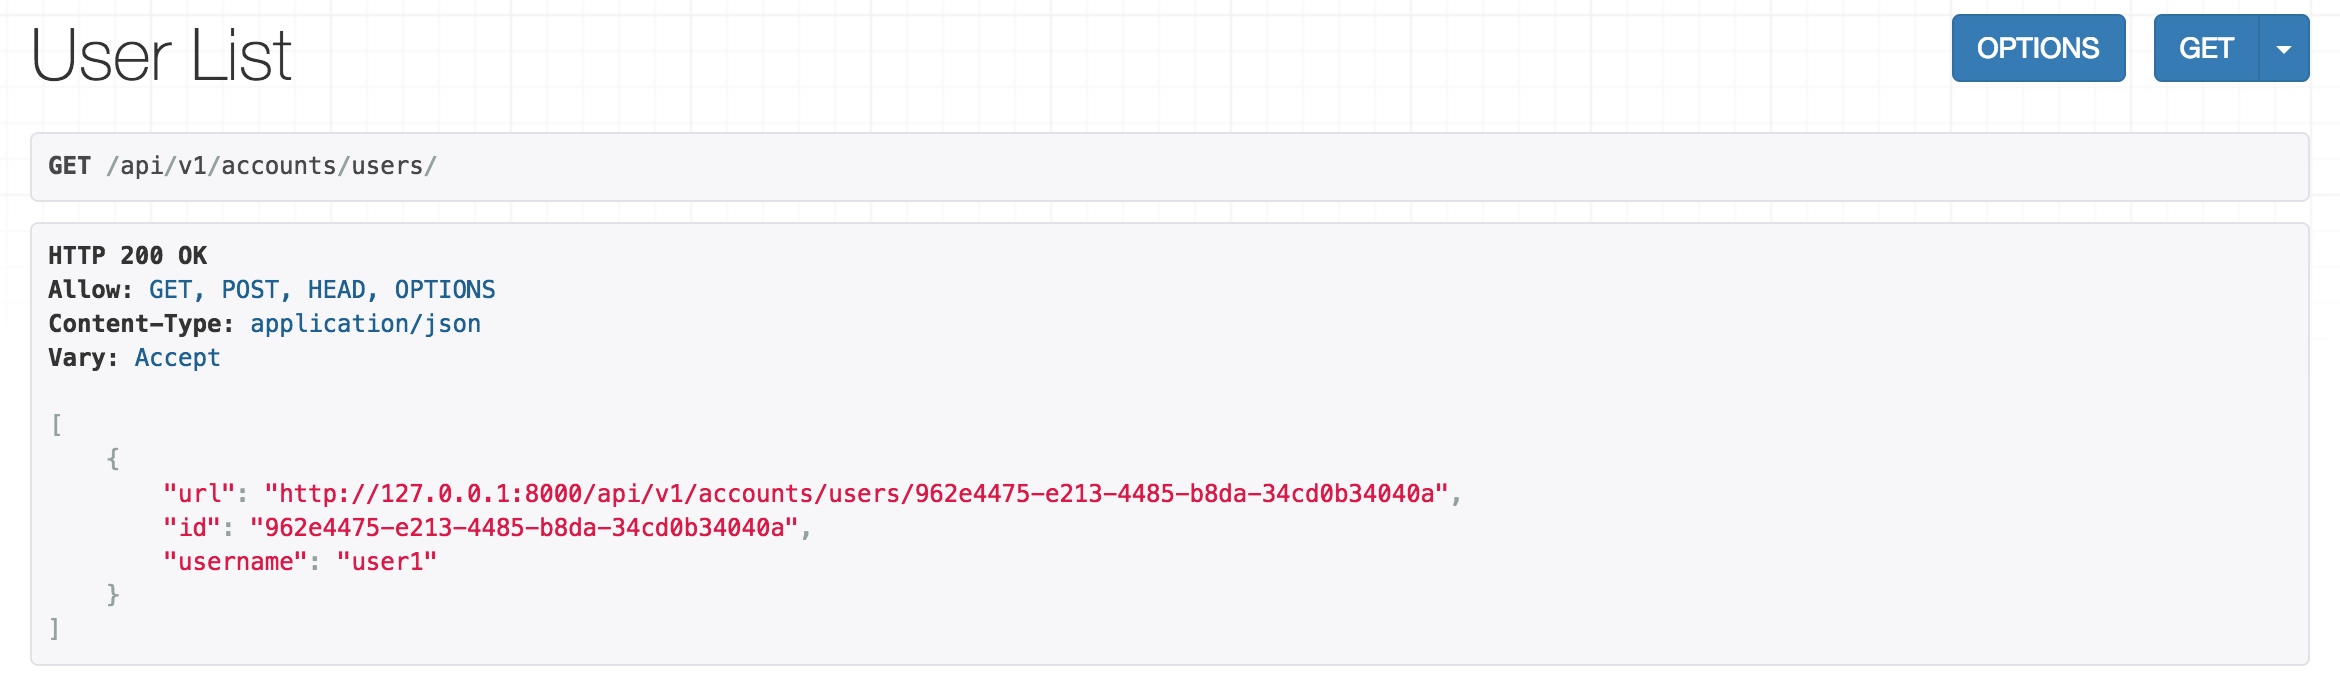 We just see one user (
user1) even though we created two. This shows our get_queryset defined in our views in action. Let’s add another user and make sure we can see that one. We’ll call this one user3. After creating the user, click the GET button and you should see both user1 and user3.
HTTP 200 OK
Allow: GET, POST, HEAD, OPTIONS
Content-Type: application/json
Vary: Accept

[
    {
        "url": "http://127.0.0.1:8000/api/v1/accounts/users/962e4475-e213-4485-b8da-34cd0b34040a",
        "id": "962e4475-e213-4485-b8da-34cd0b34040a",
        "username": "user1"
    },
    {
        "url": "http://127.0.0.1:8000/api/v1/accounts/users/896b5d68-1215-43cd-9ad5-182518cf1dcd",
        "id": "896b5d68-1215-43cd-9ad5-182518cf1dcd",
        "username": "user3"
    }
]
Take note of the URLs for the next experiment. Let’s log in as user2 and let’s try to visit one of the URLs of a user belonging to Company 1. You should see something like this:
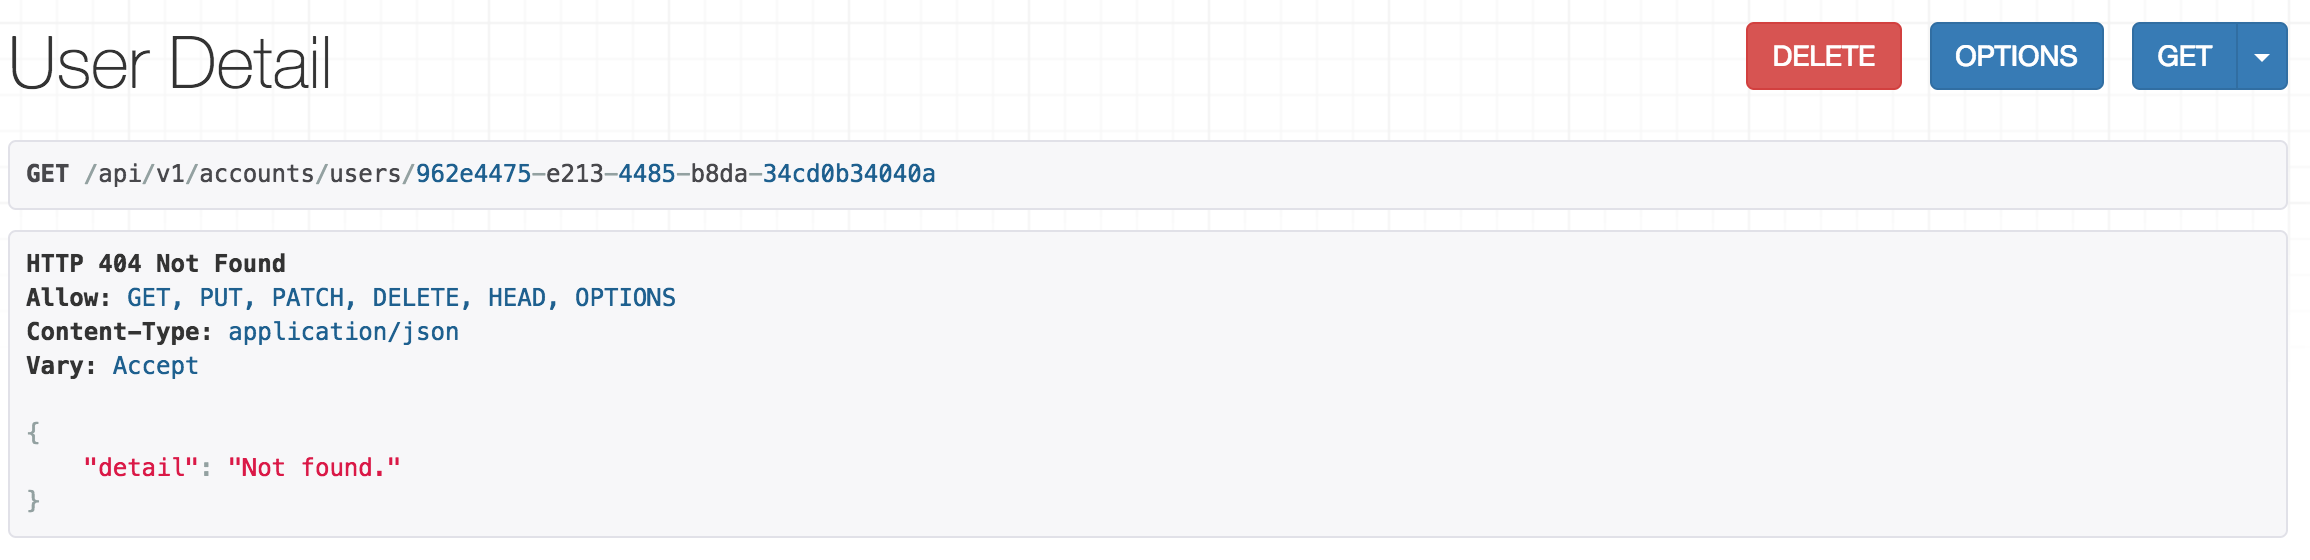 This again shows our
 get_queryset method in action. Even though a user with that uuid exists, it isn’t related to the company that user2 belongs to, so our queryset filters it out.
Let’s run one more experiment. Logged in as user2 point your browser to http://127.0.0.1:8000/api/v1/accounts/company. You should see something like this:
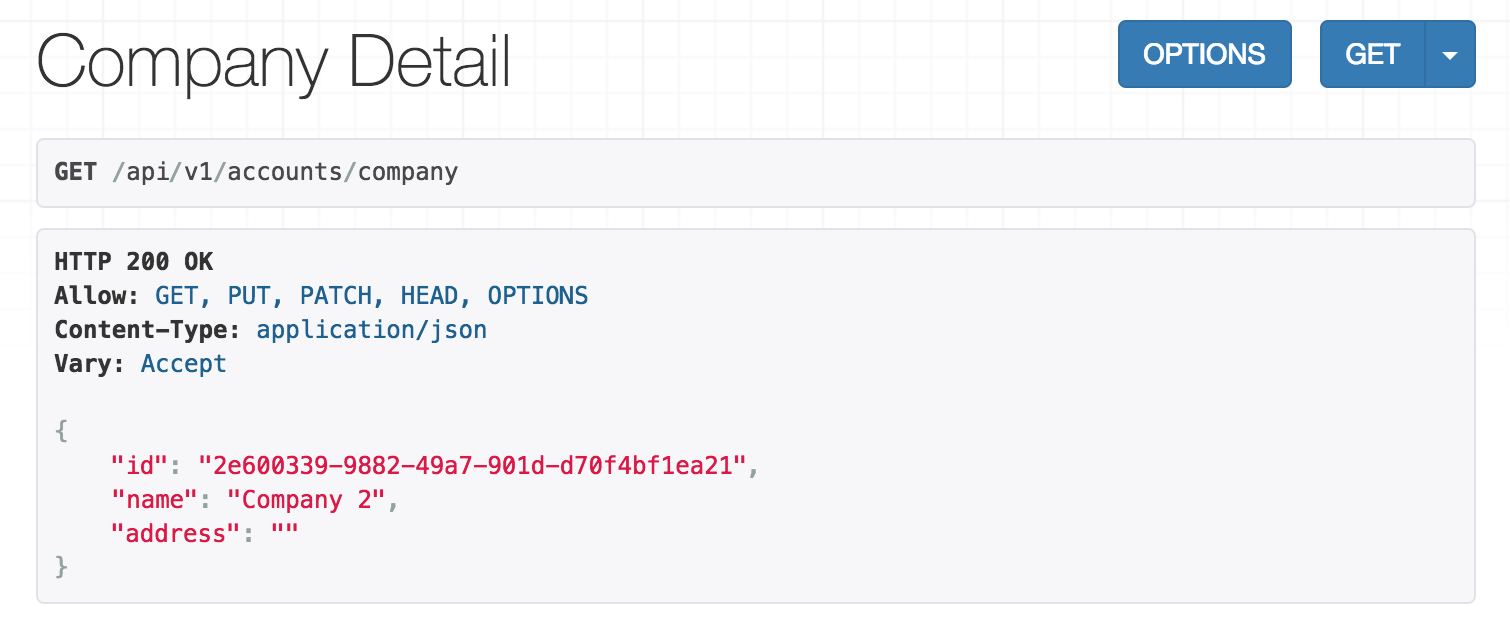
Company 2 is returned since that is the company that user2 belongs to. This shows our get_object method in action in the CompanyDetail view.
While we’re logged in as user2, let’s create user4 and user6 (let’s stick to even numbers for this company). Then, log in as either user1 or user3 and create user5.
The User Messages App
Let’s create another app called user_messages (I tried to call it messages earlier, but it conflicted with one of Django’s internal apps).
$ python manage.py startapp user_messages
$
Before we start with our UserMessage model, let’s create a model that handles the relationship with the Company model. For this, let’s create a new directory named core and let’s add a models.py there. The structure should look something like this:
$ tree | grep -v pyc
.
├── accounts
│   ├── __init__.py
│   ├── ...
├── core
│   ├── __init__.py
│   └── models.py
├── manage.py
├── saas_django
│   ├── __init__.py
│   ├── ...
└── user_messages
    ├── __init__.py
    ├── ...

9 directories, 38 files
Let’s add the following code to core/models.py:
import uuid
from django.db import models


class CompanyRelatedModel(models.Model):
    """Abstract class used by models that belong to a Company"""

    id = models.UUIDField(primary_key=True, default=uuid.uuid4, editable=False)
    company = models.ForeignKey('accounts.Company', related_name='%(class)s', on_delete=models.CASCADE, editable=False)

    class Meta:
        abstract = True
Here we define an abstract class that has a foreign key to accounts.Company. Let’s use this class by adding the following code to user_messages/models.py:
from django.contrib.auth import get_user_model
from django.db import models

from core.models import CompanyRelatedModel


User = get_user_model()


class UserMessage(CompanyRelatedModel):
    text = models.TextField('message', blank=False, null=False)
    date = models.DateTimeField('date', auto_now_add=True)
    from_user = models.ForeignKey(User, related_name='sent_messages', on_delete=models.CASCADE)
    to_user = models.ForeignKey(User, related_name='received_messages', on_delete=models.CASCADE)

    class Meta:
        db_table = 'user_messages'
        ordering = ['date']
We define a UserMessage class that inherits from CompanyRelatedModel. The model includes the following fields:
id: This field comes from theCompanyRelatedModel.company: This field comes from theCompanyRelatedModel. It relates auser_messageto acompany.text: The text of the user message.date: The date and time when the message was sent.from_user: A foreign key to the user that sent the message.to_user: A foreign key to the user that is the recipient of the message.
Let’s open our settings.py and add our app to the INSTALLED_APPS list:
INSTALLED_APPS = [
    ...

    'accounts',

    # Add this line
    'user_messages',
]
Let’s run the migrations:
$ python manage.py makemigrations
Migrations for 'user_messages':
  user_messages/migrations/0001_initial.py
    - Create model UserMessage
$ python manage.py migrate
Operations to perform:
  Apply all migrations: accounts, admin, auth, contenttypes, sessions, user_messages
Running migrations:
  Applying user_messages.0001_initial... OK
Let’s create a serializers.py file in our user_messages app and add the following code:
from rest_framework import serializers
from .models import UserMessage


class UserMessageSerializer(serializers.HyperlinkedModelSerializer):
    class Meta:
        model = UserMessage
        fields = (
            'id',
            'url',
            'from_user',
            'to_user',
            'text',
            'date',
        )
We create a UserMessageSerializer with the desired fields. We will make some modifications later.
Let’s open our views.py and add the following code:
from rest_framework import permissions
from rest_framework import generics

from . import serializers
from .models import UserMessage


class UserMessageList(generics.ListCreateAPIView):
    name = 'usermessage-list'
    permission_classes = (
        permissions.IsAuthenticated,
    )
    serializer_class = serializers.UserMessageSerializer
    queryset = UserMessage.objects.all()

    def perform_create(self, serializer):
        company_id = self.request.user.company_id
        serializer.save(company_id=company_id)

    def get_queryset(self):
        company_id = self.request.user.company_id
        return super().get_queryset().filter(company_id=company_id)


class UserMessageDetail(generics.RetrieveAPIView):
    name = 'usermessage-detail'
    permission_classes = (
       permissions.IsAuthenticated,
    )
    serializer_class = serializers.UserMessageSerializer
    queryset = UserMessage.objects.all()

    def get_queryset(self):
        company_id = self.request.user.company_id
        return super().get_queryset().filter(company_id=company_id)
We define a UserMessageList view and a UserMessageDetail view. A few things to note:
- Both views are guarded by the
IsAuthenticatedpermission. - The
perform_createfunction ensures that theUserMessageis related to the company that the current logged in user belongs to. - The
UserMessageDetailextends thegenerics.RetrieveAPIViewclass. This means that aUserMessageis not editable or deletable (can only be viewed). - The
get_querysetmethod is the same in both of these classes as well as in theUserListandUserDetailin theaccountsapplication. We’ll fix this later. - The
get_querysetmethod makes sure that users can only see messages within their company. However, a user can still see messages from other users in their company. We’ll fix this later.
Let’s create the urls.py for the user_messages app and add the following code:
from django.urls import path
from . import views


urlpatterns = [
    path('', views.UserMessageList.as_view(), name=views.UserMessageList.name),
    path('<uuid:pk>', views.UserMessageDetail.as_view(), name=views.UserMessageDetail.name),
]
Let’s include those urls in the main urls.py:
urlpatterns = [
    path('admin/', admin.site.urls),
    path('api/v1/accounts/', include('accounts.urls')),
    # Add this line
    path('api/v1/user-messages/', include('user_messages.urls')),

    path('api/v1/auth/', include('rest_framework.urls'))
]
After starting the server, navigate to http://127.0.0.1:8000/api/v1/user-messages/. You should see something like this:
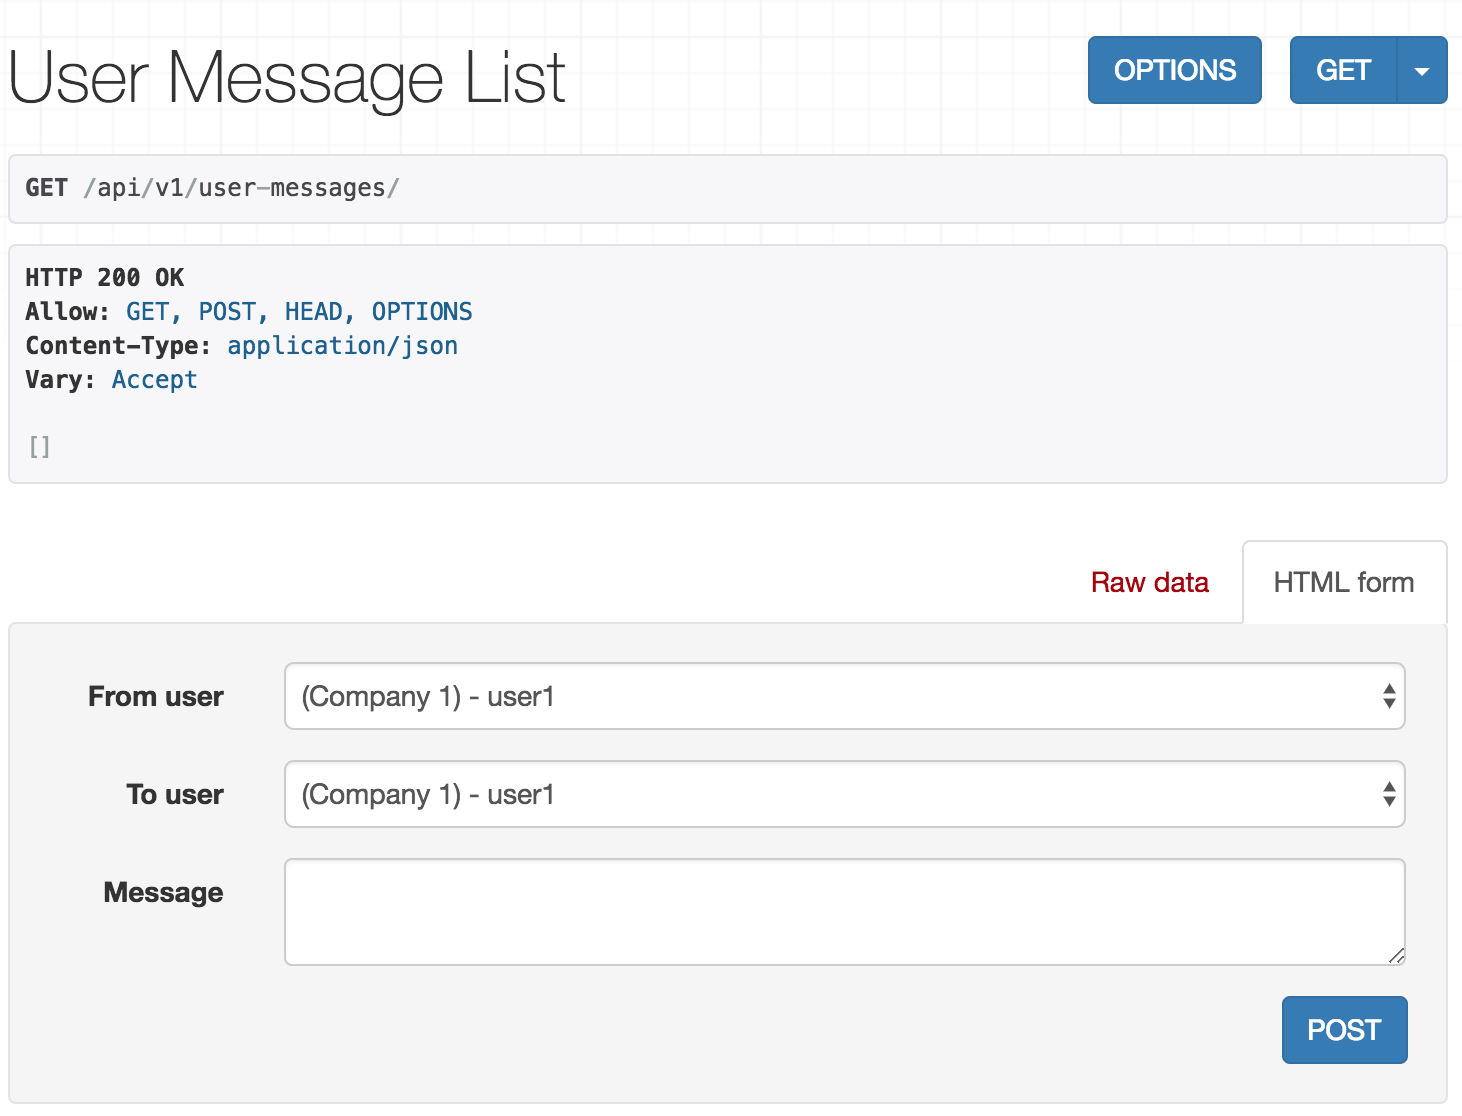
Great! We got it to work!
Refactoring the serializer
Now, on to the bad news, expand the From User select field. You should see something like this:
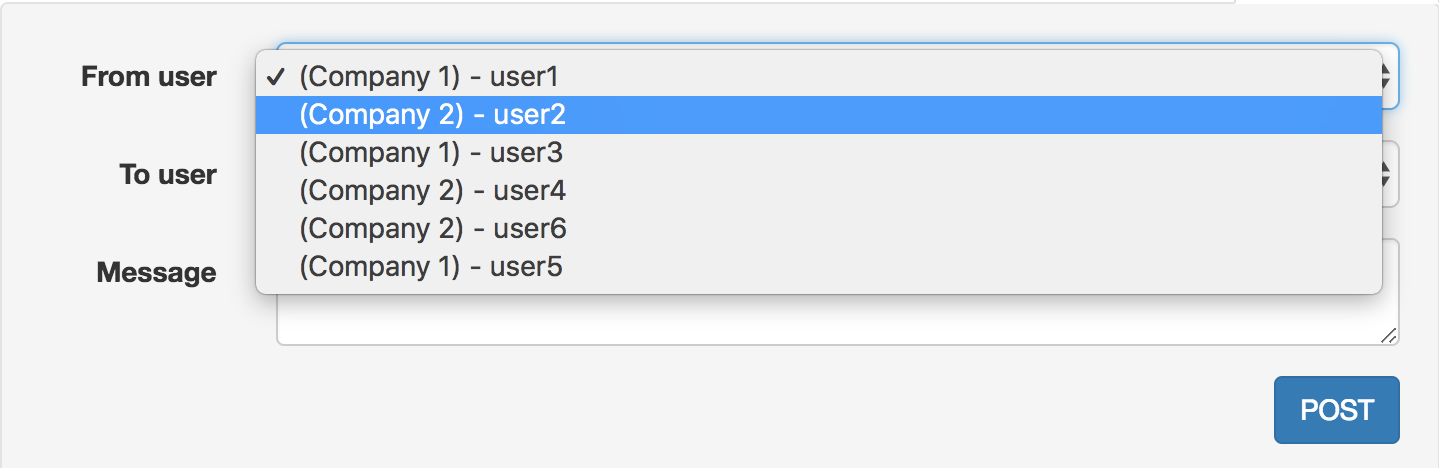
Note that we see users from both companies. To fix it, let’s create a serializers.py in core and add the following code:
from rest_framework import serializers


class CompanySafeRelatedField(serializers.HyperlinkedRelatedField):
    """
    Ensures that the queryset only returns values for the company
    """
    def get_queryset(self):
        request = self.context['request']
        company_id = request.user.company_id
        return super().get_queryset().filter(company_id=company_id)


class CompanySafeSerializerMixin(object):
    """
    Mixin to be used with HyperlinkedModelSerializer to ensure that only company values are returned
    """
    serializer_related_field = CompanySafeRelatedField
We create two classes:
CompanySafeRelatedField:- Extends the default
HyperlinkedRelatedField - Overrides the
get_querysetmethod to filter the results by the company of the logged in user.
- Extends the default
CompanySafeSerializerMixin:- Assigns the previously defined
CompanySafeRelatedFieldto theserializer_related_field. - You can read more about
serializer_related_fieldhere.
- Assigns the previously defined
Open user_messages/serializers.py and change it to be the following:
from rest_framework import serializers
# Changed line (adds the import of CompanySafeSerializerMixin)
from core.serializers import CompanySafeSerializerMixin
from .models import UserMessage

# Changed line (adds the CompanySafeSerializerMixin)
class UserMessageSerializer(CompanySafeSerializerMixin, serializers.HyperlinkedModelSerializer):
    class Meta:
        model = UserMessage
        fields = (
            'id',
            'url',
            'from_user',
            'to_user',
            'text',
            'date',
        )
Let’s head back to our browser and refresh. Your user list should only display users from the same company:
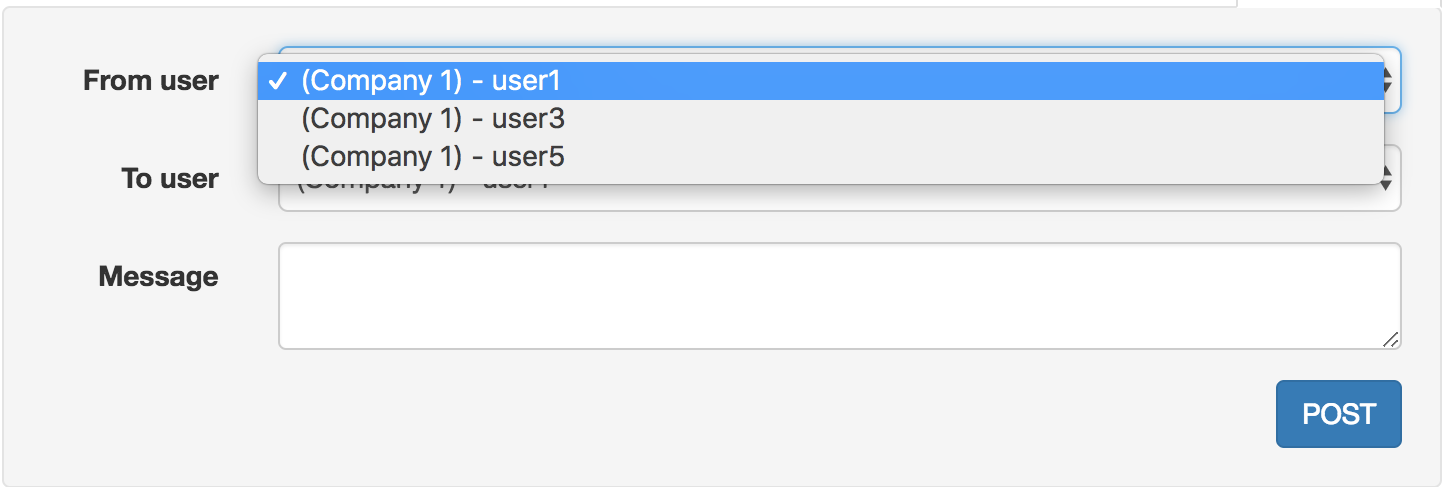
We have isolated users from other companies!
Note: A strange thing about this API is that the user needs to specify the From user. This can lead to users sending messages on behalf of other users. Since the user that is sending the message is already logged in, there is no point for the From user to be specified (the API should take care of this). We will fix this later.
Refactoring the views
Let’s abstract the Company-specific part of the views. Create core/views.py and add the following code:
from django.core import exceptions


class CompanySafeViewMixin:
    """
    Mixin to be used with views that ensures that models are related to the company during creation and are querysets
    are filtered for read operations
    """
    def get_queryset(self):
        queryset = super().get_queryset()

        if not self.request.user.is_authenticated:
            raise exceptions.NotAuthenticated()

        company_id = self.request.user.company_id
        return queryset.filter(company_id=company_id)

    def perform_create(self, serializer):
        company_id = self.request.user.company_id
        serializer.save(company_id=company_id)
This code abstracts the get_queryset and the perform_create methods since they’re pretty similar for most views.
Let’s add our mixin to our views. Open accounts/views.py and add the following code:
from rest_framework import permissions
from rest_framework import generics
from django.contrib.auth import get_user_model

# New import
from core.views import CompanySafeViewMixin
from . import serializers


User = get_user_model()


class AccountCreate(generics.CreateAPIView):
    name = 'account-create'
    serializer_class = serializers.AccountSerializer


# Added CompanySafeViewMixin
class UserList(CompanySafeViewMixin, generics.ListCreateAPIView):
    name = 'user-list'
    permission_classes = (
        permissions.IsAuthenticated,
    )
    serializer_class = serializers.UserSerializer
    queryset = User.objects.all()

    # Removed get_queryset and perform_create


# Added CompanySafeViewMixin
class UserDetail(CompanySafeViewMixin, generics.RetrieveUpdateDestroyAPIView):
    name = 'user-detail'
    permission_classes = (
       permissions.IsAuthenticated,
    )
    serializer_class = serializers.UserSerializer
    queryset = User.objects.all()

    # Removed get_queryset


class CompanyDetail(generics.RetrieveUpdateAPIView):
    name = 'company-detail'
    permission_classes = (
        permissions.IsAuthenticated,
    )
    serializer_class = serializers.CompanySerializer

    def get_object(self):
        return self.request.user.company
We inherit from the CompanySafeViewMixin that we defined before to our UserList and UserDetail views. We also remove the get_queryset and perform_create since these are already implemented in the CompanySafeViewMixin.
Preventing user impersonation & protecting user privacy
We could use the CompanySafeViewMixin in our user_messages app as well, and the current functionality would still work the same. However, we have two problems with the API right now:
- A user could impersonate another user because the From user can be specified when we create a message.
- Users could read all of the messages related to their
Companyeven if they weren’t the senders or recipients.
To fix these two problems, we need to tune our own perform_create and get_queryset to meet our needs. Let’s make a few changes in our UserMessage model first. Open user_messages/models.py and add the following code:
from django.contrib.auth import get_user_model
from django.db import models
# New import
from django.db.models import Q

from core.models import CompanyRelatedModel


User = get_user_model()

# New class
class UserMessageManager(models.Manager):

    def get_for_user(self, user):
        """Retrieves all messages that a user either sent or received"""
        return self.all().filter(company_id=user.company_id).filter(Q(from_user=user) | Q(to_user=user))


class UserMessage(CompanyRelatedModel):
    text = models.TextField('message', blank=False, null=False)
    date = models.DateTimeField('date', auto_now_add=True)
    from_user = models.ForeignKey(User, related_name='sent_messages', on_delete=models.CASCADE)
    to_user = models.ForeignKey(User, related_name='received_messages', on_delete=models.CASCADE)

    # New model manager
    objects = UserMessageManager()

    class Meta:
        db_table = 'user_messages'
        ordering = ['date']
We create a new model manager called UserMessageManager and create a method get_for_user. This method first filters by the company_id to make sure nothing ever gets returned from other companies. Then, it filters to get messages that were sent from or to the user passed in as the argument.
Let’s open user_messages/serializers.py and add the following code:
from rest_framework import serializers
from core.serializers import CompanySafeSerializerMixin
from .models import UserMessage


class UserMessageSerializer(CompanySafeSerializerMixin, serializers.HyperlinkedModelSerializer):
    class Meta:
        model = UserMessage
        fields = (
            'id',
            'url',
            'from_user',
            'to_user',
            'text',
            'date',
        )
        # New read_only field
        read_only_fields = (
            'from_user',
        )
We make the from_user a read-only field. That way, our API will still return the sender of a message but won’t allow it to be edited. Since the from_user field can’t be specified by the client, we need to make a change in the view. Open user_messages/views.py and add the following code:
from rest_framework import permissions
from rest_framework import generics

from . import serializers
from .models import UserMessage


class UserMessageList(generics.ListCreateAPIView):
    name = 'usermessage-list'
    permission_classes = (
        permissions.IsAuthenticated,
    )
    serializer_class = serializers.UserMessageSerializer
    queryset = UserMessage.objects.all()

    def perform_create(self, serializer):
        user = self.request.user
        company_id = user.company_id
        # Added from_user
        serializer.save(company_id=company_id, from_user=user)

    def get_queryset(self):
        # Changed this to use the UserMessageManager's method
        return UserMessage.objects.get_for_user(self.request.user)


class UserMessageDetail(generics.RetrieveAPIView):
    name = 'usermessage-detail'
    permission_classes = (
       permissions.IsAuthenticated,
    )
    serializer_class = serializers.UserMessageSerializer

    def get_queryset(self):
        # Changed this to use the UserMessageManager's method
        return UserMessage.objects.get_for_user(self.request.user)
This fixes the two issues mentioned above. We change the perform_create function to include the from_user in the serializer.save call. We pass in the user that is currently logged in. We also change the get_queryset method to only return messages that were either sent or received by the current user.
Testing it out
Let’s log in as user3 and navigate to http://127.0.0.1:8000/api/v1/user-messages/. Let’s send a message to user1:
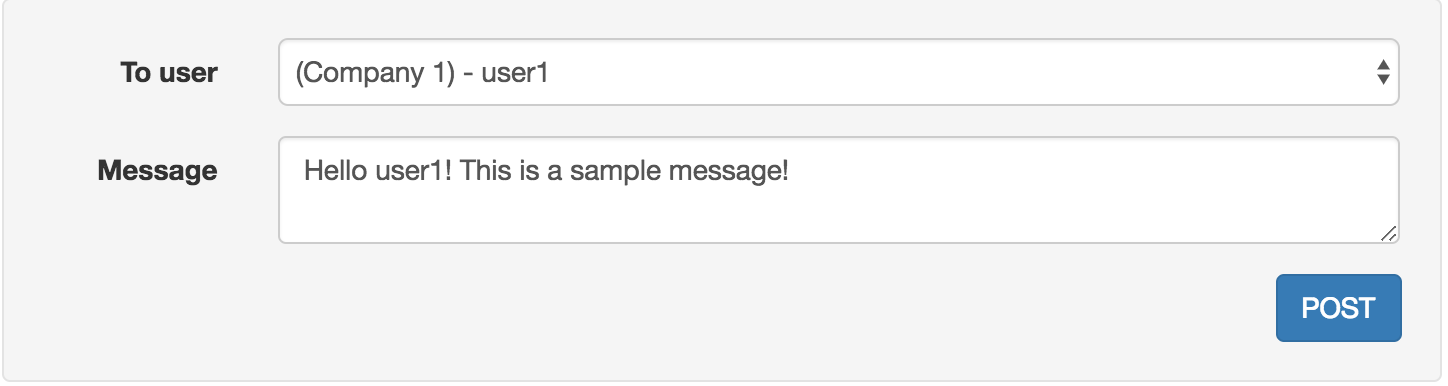 Note that there is no longer a choice to set the From user. Let’s press the POST button and verify that the message gets created with
 from_user as user3:
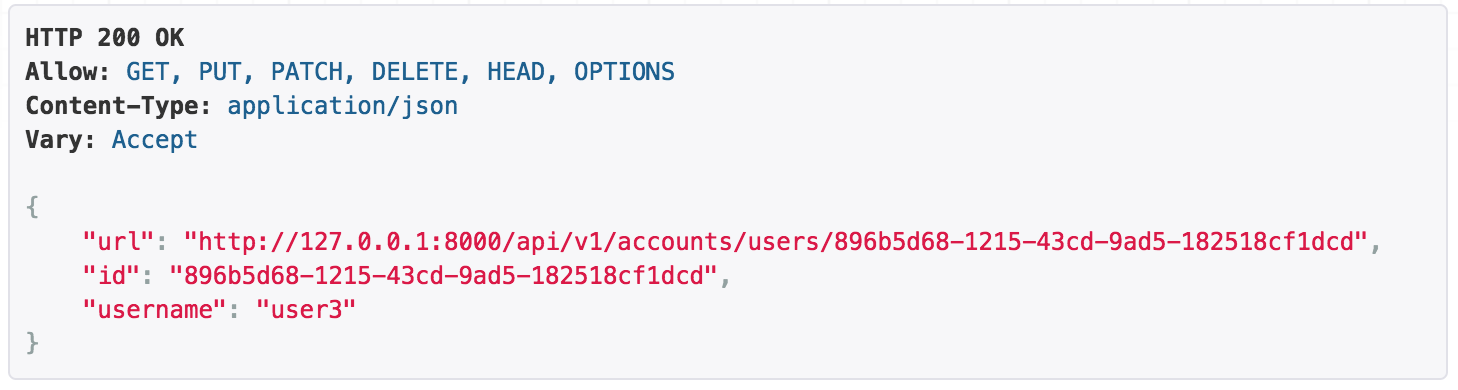
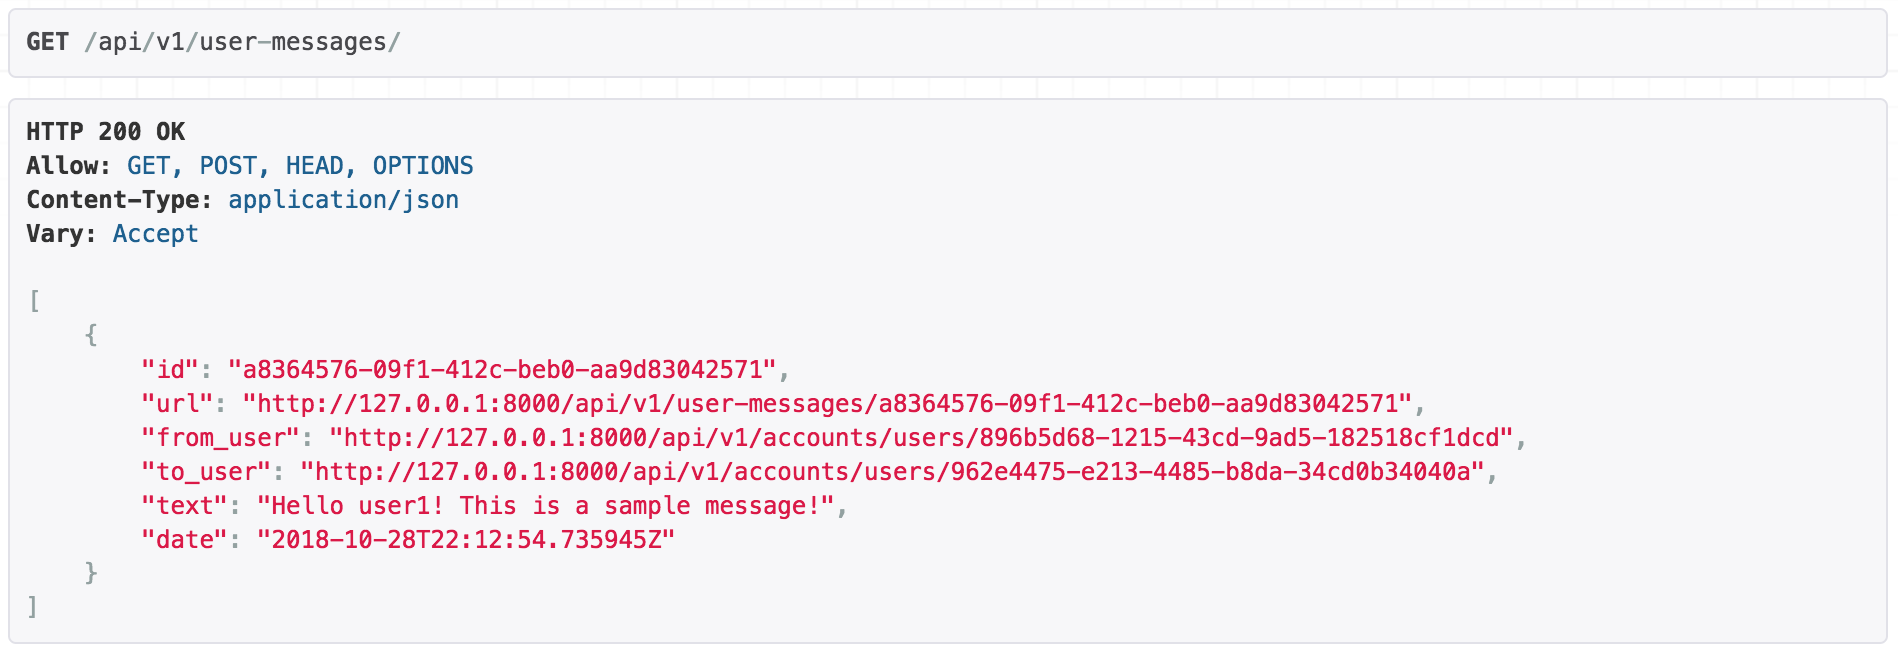 Note that the
 from_user field is a URL. Let’s click on that URL to make sure it’s user3.
Let’s log in as user1 in a different browser and reply to user3. The messages should be visible for both user1 and user3.
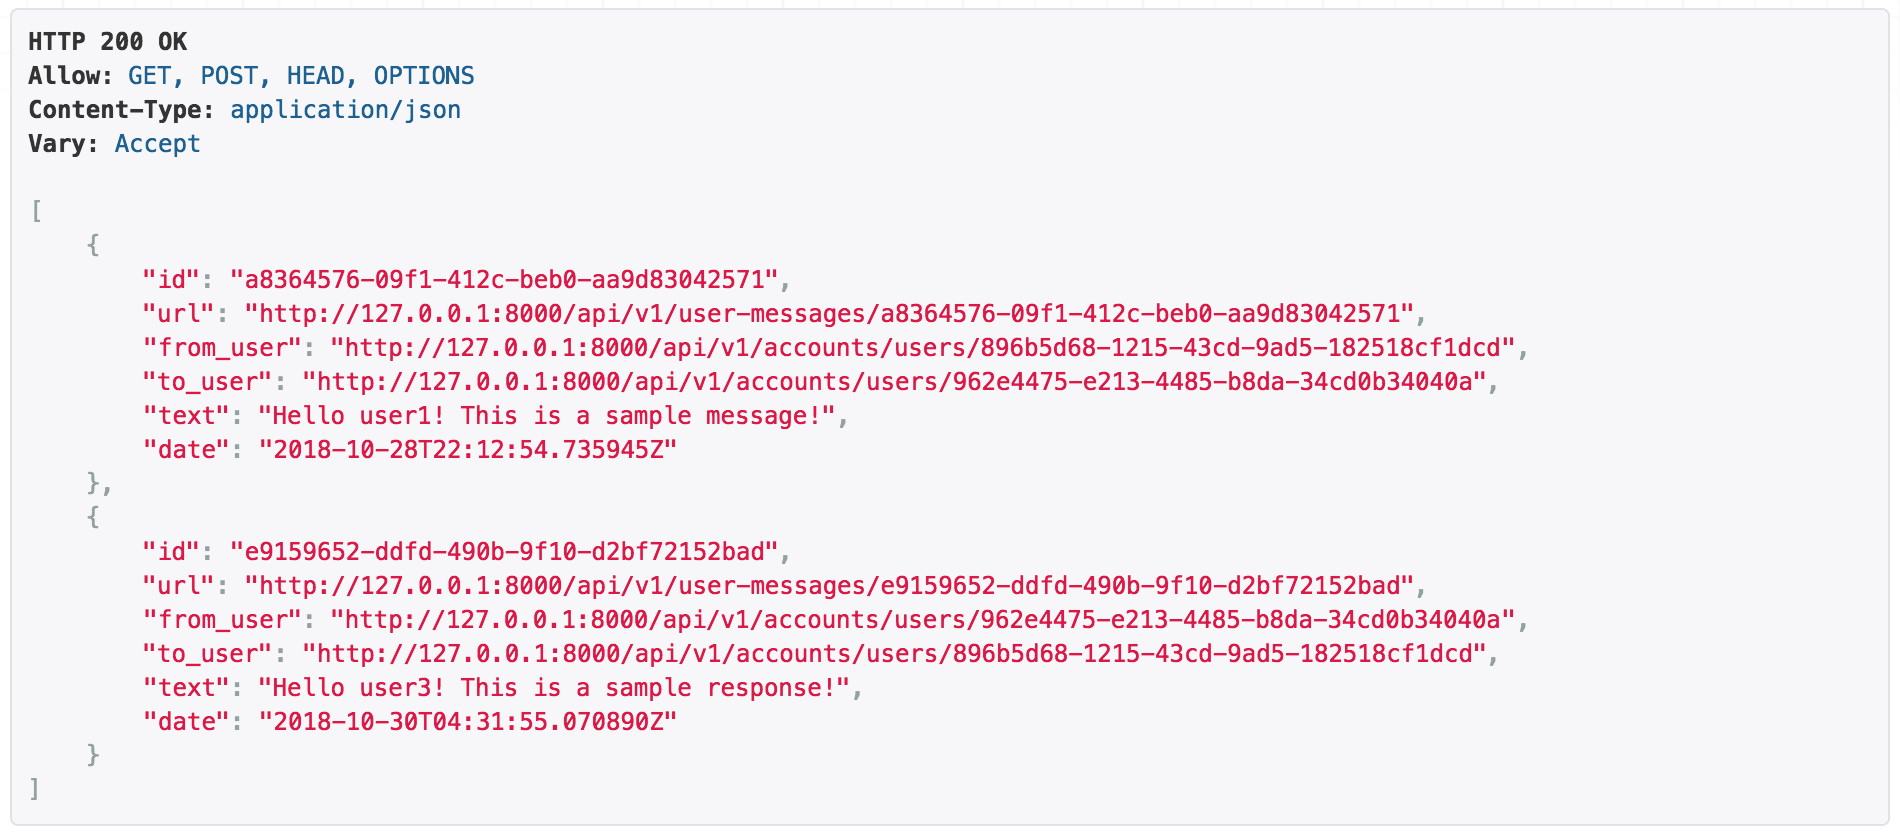 As expected, the messages can be seen by both
 user1 and user3. Let’s log in as user5 and navigate to http://127.0.0.1/api/v1/user-messages/. We shouldn’t be able to see any of the messages that we created.
 As expected,
 user5 sees an empty list since no messages have been sent to/by this user.
Further improvements
We’re now done with a simple use-case. Here are some ways to improve this further:
- Add real versioning support for the API.
- Improve the directory structure to have a more cookiecutter approach.
- Remove SQLite and use Postgres.
- Prevent users from deleting themselves (can be done using permissions).
- Validate that users don’t message themselves.
- Prevent users from modifying other users (can be done using permissions).
- Add more models and views to use the
CompanyRelatedModelandCompanySafeViewMixin. - Add filtering for user messages to be able to filter by
from_user,to_user,date, etc (can be done using django-filter). - Add the possibility to mark a message as read.
Conclusion
We went through the process of creating a SaaS messaging application that uses the same database schema for everybody. We went through incremental features and improvements to get to a final product that implemented all of our use-cases. We also abstracted out the repetitive code to make it more maintainable.
Links
- Model Managers
- Tom Christie about Django Rest Framework at Django: Under The Hood
- Tips for building high quality django apps at scale from DoorDash
- Serializer Related Field
- API Versioning in rest framework
- Cookiecutter project
- Postgres
- Permissions in rest framework
- Django organizations
- Django tenant schemas
- django-filter